tow Ram 1500 2013 Get to Know Guide
[x] Cancel search | Manufacturer: RAM, Model Year: 2013, Model line: 1500, Model: Ram 1500 2013Pages: 196, PDF Size: 9.66 MB
Page 154 of 196

• Using the screwdriver or similar tool, push the Manual Park Release leverlocking tab (just below the middle of the lever) to the right.
• While holding the locking tab in the disengaged position, pull the tether
strap to rotate the lever rearward,
until it locks in place pointing to-
wards the driver's seat. Release the
locking tab and verify that the
Manual Park Release lever is locked
in the released position.
• The vehicle is now out of PARK and can be towed. Release the parking
brake only when the vehicle is se-
curely connected to a tow vehicle.
To Reset The Manual Park Release:
• Push the locking tab to the right, to unlock the lever.
• Rotate the Manual Park Release lever forward to its original position, until
the locking tab snaps into place to
secure the lever.
• Pull gently on the tether strap to con- firm that the lever is locked in its
stowed position.
• Re-install the access cover.
WARNING!
Always secure your vehicle by fully applying the parking brake, before activating
the Manual Park Release. Activating the Manual Park Release will allow your
vehicle to roll away if it is not secured by the parking brake or by proper connection
to a tow vehicle. Activating the Manual Park Release on an unsecured vehicle
could lead to serious injury or death for those in or around the vehicle.
WHAT TO DO IN EMERGENCIES
152
Page 155 of 196

TOWING A DISABLED VEHICLE
Towing Condition Wheels OFF the Ground2WD Models4WD Models
Flat Tow NONEIf transmission is operable:
• Transmission in NEUTRAL
• 30 mph (48 km/h) max
• 15 miles (24 km) maxdistance •
Auto Transmission in PARK
• Manual Transmission in gear
(NOT NEUTRAL)
• Transfer Case in NEUTRAL
• Tow in FORWARD direction
Wheel Lift or Dolly Tow Front
NOT ALLOWED
Rear OK
NOT ALLOWED
Flatbed ALL
BEST METHOD BEST METHOD
WHAT TO DO IN EMERGENCIES
153
Page 170 of 196

MAINTENANCE SCHEDULE – GASOLINE ENGINE
Your vehicle is equipped with an automatic oil change indicator system. The oil change
indicator system will remind you that it is time to take your vehicle in for scheduled
maintenance.
Based on engine operation conditions, the oil change indicator message will
illuminate. This means that service is required for your vehicle. Operating conditions
such as frequent short-trips, trailer tow, extremely hot or cold ambient temperatures,
and E85 fuel usage will influence when the “Oil Change Required” message is
displayed. Severe Operating Conditions can cause the change oil message to
illuminate as early as 3,500 miles (5,600 km) since last reset. Have your vehicle
serviced as soon as possible, within the next 500 miles (805 km).
Your authorized dealer will reset the oil change indicator message after completing
the scheduled oil change. If a scheduled oil change is performed by someone other
than your authorized dealer, the message can be reset by referring to the steps
described under “Electronic Vehicle Information Center (EVIC)/Oil Change Re-
quired” in “Understanding Your Instrument Panel” for further information.
NOTE:
Under no circumstances should oil change intervals exceed 10,000 miles (16,000 km)
or twelve months, whichever comes first.
Once A Month Or Before A Long Trip:
• Check engine oil level
• Check windshield washer fluid level
• Check the tire inflation pressures and look for unusual wear or damage
• Check the fluid levels of the coolant reservoir, brake master cylinder, powersteering (2500/3500 Models Only) and automatic transmission (six-speed only) as
needed
• Check function of all interior and exterior lights
MAINTAINING YOUR VEHICLE
168
Page 172 of 196

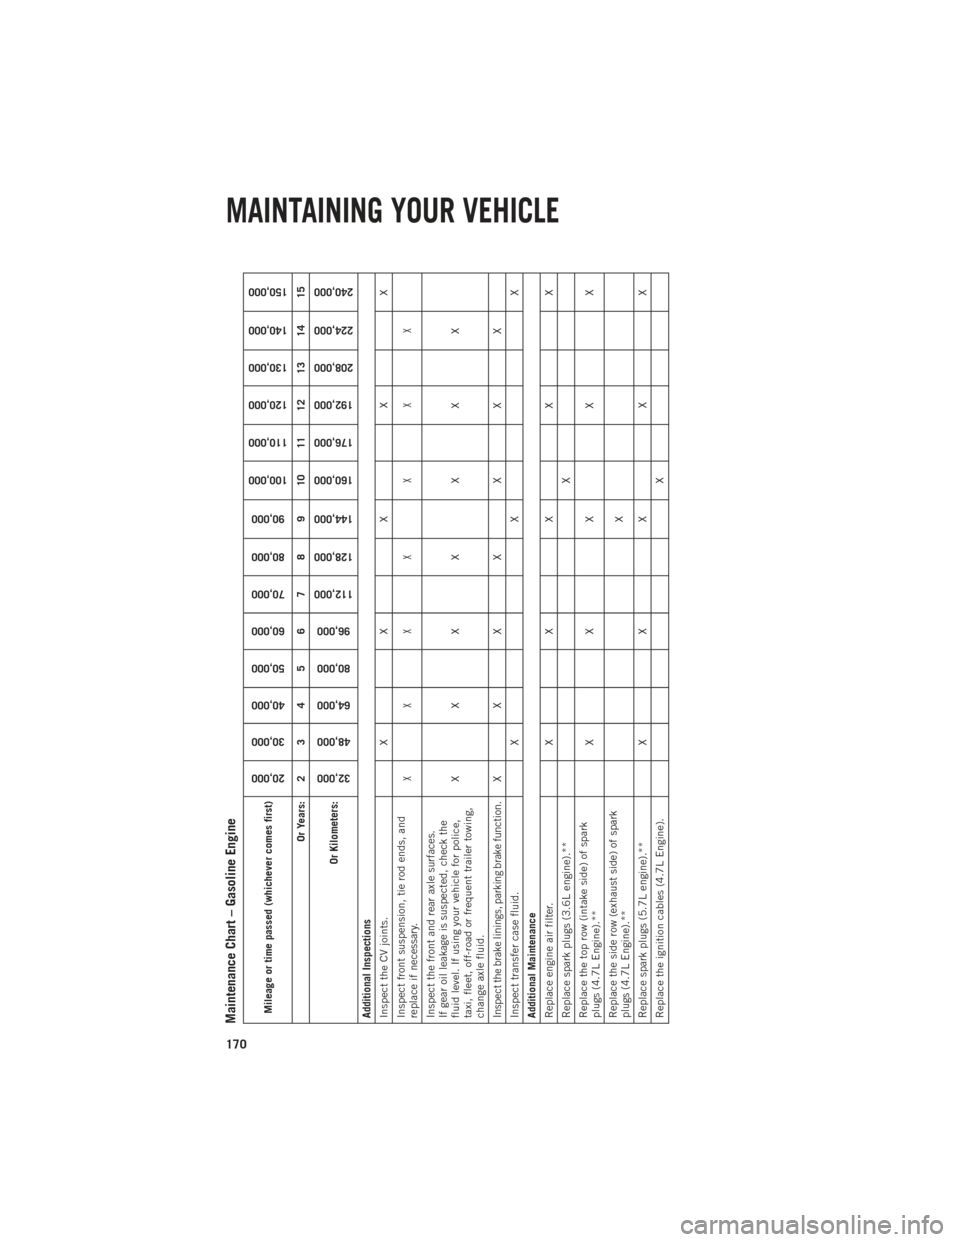
Maintenance Chart – Gasoline EngineMileage or time passed (whichever comes first)
20,000
30,000
40,000
50,000
60,000
70,000
80,000
90,000
100,000
110,000
120,000
130,000
140,000
150,000
Or Years: 2 3 4 5 6 7 8 9 10 11 12 13 14 15
Or Kilometers:
32,000
48,000
64,000
80,000
96,000
112,000
128,000
144,000
160,000
176,000
192,000
208,000
224,000
240,000
Additional Inspections
Inspect the CV joints. X X X X X
Inspect front suspension, tie rod ends, and
replace if necessary.
XX X X X X X
Inspect the front and rear axle surfaces.
If gear oil leakage is suspected, check the
fluid level. If using your vehicle for police,
taxi, fleet, off-road or frequent trailer towing,
change axle fluid. XX X X X X XInspect the brake linings, parking brake function.
XX X X X X X
Inspect transfer case fluid. X X X
Additional Maintenance
Replace engine air filter. X X X X X
Replace spark plugs (3.6L engine).** X
Replace the top row (intake side) of spark
plugs (4.7L Engine).** XX X X X
Replace the side row (exhaust side) of spark
plugs (4.7L Engine).** X
Replace spark plugs (5.7L engine).** X X X X X
Replace the ignition cables (4.7L Engine). X
MAINTAINING YOUR VEHICLE
170
Page 173 of 196

Mileage or time passed (whichever comes first)
20,000
30,000
40,000
50,000
60,000
70,000
80,000
90,000
100,000
110,000
120,000
130,000
140,000
150,000
Or Years: 2 3 4 5 6 7 8 9 10 11 12 13 14 15
Or Kilometers:
32,000
48,000
64,000
80,000
96,000
112,000
128,000
144,000
160,000
176,000
192,000
208,000
224,000
240,000
Flush and replace the engine coolant at
10 years or 150,000 miles (240,000 km)
whichever comes first. XX
Change automatic transmission fluid and
filter(s), if using your vehicle for police, taxi,
fleet, or frequent trailer towing. XChange automatic transmission fluid and filter.
X
Inspect the transfer case fluid, change for any
of the following: police, taxi, fleet, or frequent
trailer towing. X
Change the transfer case fluid. X
Inspect and replace PCV valve if necessary. X
** The spark plug change interval is mileage based only, yearly intervals do not apply.
WARNING!
• You can be badly injured working on or around a motor vehicle. Do only service work for which you have the knowledge and the
right equipment. If you have any doubt about your ability to perform a service job, take your vehicle to a competent mechanic.
• Failure to properly inspect and maintain your vehicle could result in a component malfunction and effect vehicle handling and
performance. This could cause an accident.
MAINTAINING YOUR VEHICLE
171
Page 177 of 196

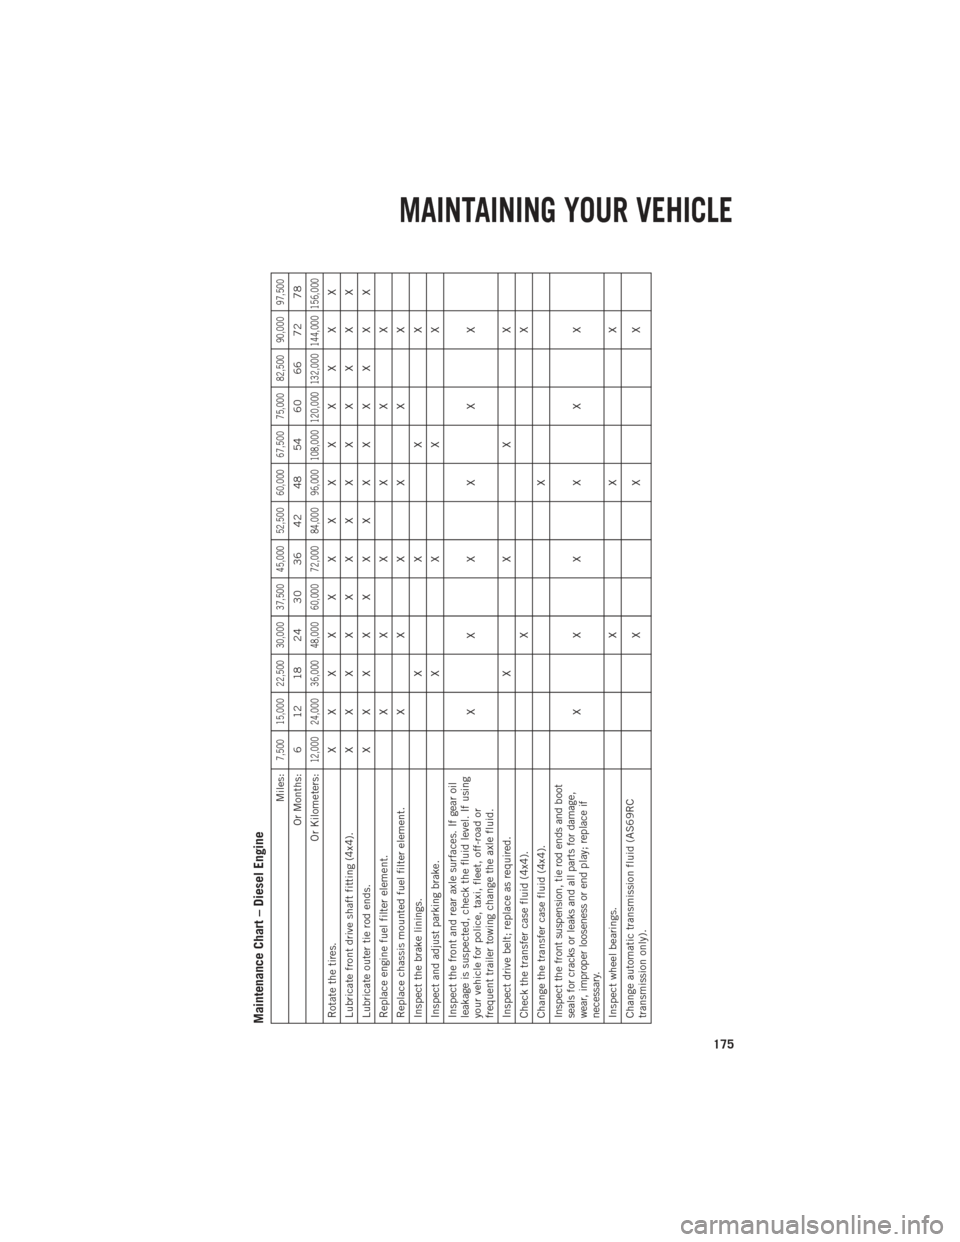
Maintenance Chart – Diesel Engine
Miles:
7,500 15,000 22,500 30,000 37,500 45,000 52,500 60,000 67,500 75,000 82,500 90,000 97,500
Or Months: 6 12 18 24 30 36 42 48 54 60 66 72 78
Or Kilometers:
12,000 24,000 36,000 48,000 60,000 72,000 84,000 96,000 108,000 120,000 132,000 144,000 156,000
Rotate the tires. X XXXXXXXXXXXX
Lubricate front drive shaft fitting (4x4). X XXXXXXXXXXXX
Lubricate outer tie rod ends. X XXXXXXXXXXXX
Replace engine fuel filter element. XXXXXX
Replace chassis mounted fuel filter element. XXXXXX
Inspect the brake linings. XXXX
Inspect and adjust parking brake. XXXX
Inspect the front and rear axle surfaces. If gear oil
leakage is suspected, check the fluid level. If using
your vehicle for police, taxi, fleet, off-road or
frequent trailer towing change the axle fluid. XXXXXX
Inspect drive belt; replace as required. XXXX
Check the transfer case fluid (4x4). XX
Change the transfer case fluid (4x4). XInspect the front suspension, tie rod ends and boot
seals for cracks or leaks and all parts for damage,
wear, improper looseness or end play; replace if
necessary.
XXXXXX
Inspect wheel bearings. XXX
Change automatic transmission fluid (AS69RC
transmission only). XXX
MAINTAINING YOUR VEHICLE
175
Page 178 of 196

Miles:
7,500 15,000 22,500 30,000 37,500 45,000 52,500 60,000 67,500 75,000 82,500 90,000 97,500
Or Months: 6 12 18 24 30 36 42 48 54 60 66 72 78
Or Kilometers:
12,000 24,000 36,000 48,000 60,000 72,000 84,000 96,000 108,000 120,000 132,000 144,000 156,000
Change automatic transmission fluid and filter(s)
if using your vehicle for any of the following:
police, fleet, or frequent trailer towing
(68RFE transmission only). X
Change the manual transmission fluid if using your
vehicle for any of the following: police, fleet, or
frequent trailer towing. X
Check the Diesel Exhaust Fluid (DEF) tank; refill if
necessary. XXXXXXXXXXXXX
Replace Crankcase Ventilation Filter (CCV). X
Flush and replace power steering fluid. X
MAINTAINING YOUR VEHICLE
176
Page 181 of 196

Cavity Cartridge Fuse Micro FuseDescription
F25 30 Amp Pink Front Wiper High Speed
F26 30 Amp Pink Antilock Brakes/Stability Control
Module/Valves
F28 20 Amp Yellow Trailer Tow Backup Lights –
If Equipped
F29 20 Amp Yellow Trailer Tow Parking Lights –
If Equipped
F30 30 Amp Pink Trailer Tow Receptacle
F32 30 Amp Pink Drive Train Control Module –
If Equipped
F33 20 Amp Yellow Diesel Fuel Heater #1 –
If Equipped / Rear Blower – If Equipped
F34 30 Amp Pink Vehicle System Interface
Module #2 – If Equipped
F35 30 Amp Pink Sunroof – If Equipped
F36 30 Amp Pink Rear Defroster– If Equipped
F37 30 Amp Pink Diesel Fuel Heater #2 if equipped
F38 30 Amp Pink Power Inverter 115V AC –
If Equipped
F39 30 Amp Pink Vehicle System Interface
Module #1– If Equipped
F41 10 Amp RedActive Grill Shutter
F42 20 Amp Yellow Horn
F43 10 Amp Red Snow Plow (Left) – If Equipped
F44 10 Amp RedDiagnostic Port
F46 10 Amp Red Tire Pressure Monitor
F47 10 Amp Red Snow Plow (Right) – If Equipped
F49 10 Amp Red Instrument Panel Cluster
F50 20 Amp Yellow Air Suspension Control Module –
If Equipped
F51 10 Amp Red Ignition Node Module / Keyless
Ignition
F52 5 Amp TanBattery Sensor
F53 20 Amp Yellow Trailer Tow – Left Turn/Stop Lights
F54 20 Amp Yellow Adjustable Pedals
F55 20 Amp Yellow E38 Radio – If Equipped
F56 15 Amp Blue Additional Diesel Content –
If Equipped
F57 20 Amp YellowTransmission
MAINTAINING YOUR VEHICLE
179
Page 182 of 196

Cavity Cartridge Fuse Micro FuseDescription
F58 20 Amp Yellow
(Gas Engine) /
25 Amp Natural (Diesel Engine) Engine Cooling Pump
F60 15 Amp BlueUnderhood Lamp
F61 20 Amp Yellow Power Take-off Unit – If Equipped
F62 10 Amp Red Air Conditioning Clutch
F63 20 Amp Yellow IgnitionCoils (Gas), Urea Heater
(Diesel)
F64 25 Amp Natural Fuel Injectors / Powertrain
F65 10 Amp RedUSB interface
F66 10 Amp Red Sunroof / Passenger Window
Switches / Rain Sensor
F67 10 Amp Red CD / DVD / Bluetooth Hands-free
Module – If Equipped
F69 15 Amp Blue Mod SCR 12V – If Equipped
F70 30 Amp GreenFuel Pump Motor
F71 25 Amp Natural Amplifier
F72 10 Amp Red Voltage Stabilizer Modules –
If Equipped
F74 20 Amp Yellow
(Gas Engine) / 10 Amp Red
(Diesel Engine) Brake Vacuum Pump Gas/Diesel –
If Equipped
F75 10 Amp Red Coolant Temperature Valve
Actuator
F76 10 Amp Red Antilock Brakes/Electronic
Stability Control
F77 10 Amp Red Drivetrain Control Module/Front
Axle Disconnect Module
F78 10 Amp Red Engine Control Module / Electric
Power Steering
F79 15 Amp BlueClearance Lights
F80 10 Amp Red Universal Garage Door Opener /
Compass
F81 20 Amp Yellow Trailer Tow Right Turn/Stop Lights
F82 10 Amp Red Steering Column Control
Module/ Cruise Control
F84 15 Amp Blue Switch Bank/Instrument Cluster
F85 10 Amp RedAirbag Module
F86 10 Amp RedAirbag Module
MAINTAINING YOUR VEHICLE
180
Page 183 of 196

Cavity Cartridge Fuse Micro FuseDescription
F87 10 Amp Red Air Suspension / Trailer Tow /
Steering Column Control Module
F88 15 Amp Blue Instrument Panel Cluster
F90/F91 20 Amp Yellow Power Outlet (Rear seats)
Customer Selectable
F93 20 Amp YellowCigar Lighter
F94 10 Amp Red Shifter / Transfer Case Module
F95 10 Amp Red Rear Camera / Park Assist
F96 10 Amp Red Rear Seat Heater Switch
F97 25 Amp Natural Rear Heated Seats & Heated
Steering Wheel – If Equipped
F98 25 Amp Natural Front Heated Seats – If Equipped
F99 10 Amp RedClimate Control
F101 15 Amp Blue Electrochromatic Mirror / Smart
High Beams – If Equipped
F104 20 Amp Yellow Power Outlets (Instrument Panel/
Center Console)
CAUTION!
•When installing the power distribution center cover, it is important to ensure the
cover is properly positioned and fully latched. Failure to do so may allow water to
get into the power distribution center and possibly result in an electrical system
failure.
•When replacing a blown fuse, it is important to use only a fuse having the correct
amperage rating. The use of a fuse with a rating other than indicated may result
in a dangerous electrical system overload. If a properly rated fuse continues to
blow, it indicates a problem in the circuit that must be corrected.
MAINTAINING YOUR VEHICLE
181